By the team at South Bend Garage Door Repair | Updated 2025
Reviewed by Mike Harrington, Lead Garage Door Technician at South Bend Garage Door Repair. Mike has over 14 years of field experience servicing LiftMaster, Chamberlain, and Craftsman garage door systems across St. Joseph County and the surrounding Michiana area.
Table of Contents
- How LiftMaster Garage Door Openers Work
- How to Reset a LiftMaster Garage Door Opener
- How to Reprogram a LiftMaster Garage Door Opener
- How to Program a LiftMaster Remote
- Why Your LiftMaster Remote Is Not Working
- How to Program a LiftMaster Keypad
- Common LiftMaster Troubleshooting Problems
- When to Call a Professional
If you’ve ever walked into your garage, clicked your remote, and gotten absolutely nothing — you know that sinking feeling. Whether your LiftMaster opener has stopped responding, a remote lost its pairing after a power outage, or you’re setting up a new keypad for the first time, this guide covers everything you need to know.
We’ve helped hundreds of homeowners across the South Bend area work through exactly these problems. Most of the time, the fix is simpler than people expect. But we’ll also be straight with you about when it’s time to pick up the phone.
Let’s get into it.
How LiftMaster Garage Door Openers Work
Before jumping into steps, it helps to understand what’s actually happening when you press that button
LiftMaster openers use rolling code technology — a security system that generates a brand-new encrypted code every single time the remote is used. Your remote and the opener’s receiver stay synchronized to the same “next code,” which is why you can’t simply copy someone else’s signal. It changes with every press.
The control center of the whole system is the Learn button, located on the back or side of the opener motor unit. This button is what allows new remotes, keypads, and smart devices to pair with your opener. Nearly every programming task in this guide involves it.
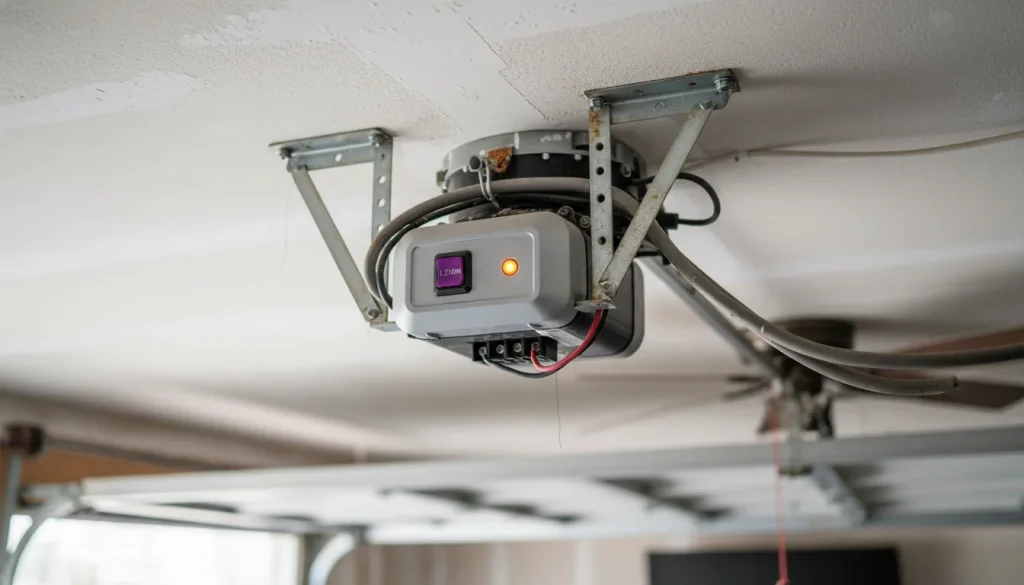
Modern LiftMaster units also support WiFi connectivity through the MyQ platform, letting you monitor and control your garage door remotely from a smartphone. The motor unit, safety sensors, rolling code receiver, and smart home features all work as one integrated system — and understanding that relationship makes diagnosing problems much faster.
How to Reset a LiftMaster Garage Door Opener
There are two different things homeowners mean when they say “reset” — and they’re handled differently.
Full Memory Erase (Clear All Paired Devices)
This is the right move when you’ve moved into a new home, lost a remote, or want to wipe out old devices entirely.
- Locate the Learn button on your opener motor unit.
- Press and hold it for approximately 6 seconds until the LED indicator goes out.
- Release. All previously paired remotes, keypads, and MyQ devices are now erased.
You’ll need to reprogram any devices you still want to use.
Soft Reset (After Power Outage or Electronic Glitch)
If your opener behaved strangely after a storm — something South Bend homeowners deal with during rough Indiana winters , start here before assuming anything is seriously wrong.
- Unplug the opener from the ceiling outlet.
- Wait 30 full seconds.
- Plug it back in and test.
This clears minor electronic glitches and takes about 30 seconds. It’s always worth trying first.
Safety Warning: Before working near your opener unit, make sure the garage door is fully closed. Keep hands and fingers away from the door tracks and springs at all times. Spring systems are under extreme tension and are not DIY-safe.
How to Re-program a LiftMaster Garage Door Opener
Reprogramming re-syncs your remote or keypad to the opener — typically after a full reset, or when the rolling code has drifted out of sync.
- Confirm the door is closed and the area around it is clear.
- Press and release the Learn button once. The LED will light up and stay on for 30 seconds — that’s your pairing window.
- Within those 30 seconds, press and hold the button on your remote for about 3 seconds, then release.
- The opener’s lights will flash, or you’ll hear two clicks — either confirms the pairing was successful.
- Test the remote from across the garage.
Most common mistake: Holding the Learn button too long, which triggers a full memory erase instead of opening the 30-second pairing window. It’s a light press and release — not a hold.
For multi-button remotes, repeat the process for each button you want to assign to a specific door.
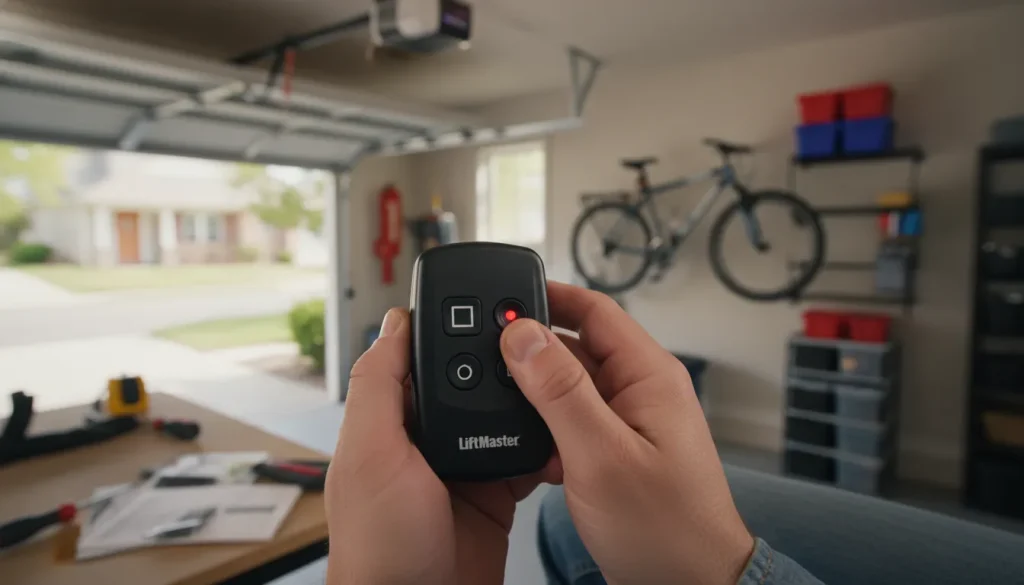
How to Program a LiftMaster Remote
Got a brand-new remote out of the box? A few things to verify before starting:
Check compatibility. LiftMaster remotes aren’t universal across all models. The Learn button color tells you which frequency your opener uses:
| Learn Button Color | Frequency | Notes |
| Yellow | 390 MHz | Older models |
| Green | 315 MHz | Mid-generation |
| Purple | 315 MHz | Security+ |
| Orange | 315 MHz | Security+ 2.0 (newest) |
Install a fresh battery. New remotes sometimes ship with a dead or weak cell. Most LiftMaster remotes use a CR2032 coin battery — confirm the type listed on the back of your specific remote.
Once you’ve verified compatibility and battery:
- Press and release the Learn button on the opener unit.
- Within 30 seconds, press the desired button on the new remote (hold for 3 seconds on newer Security+ 2.0 models).
- Wait for the confirmation flash or double-click.
- Test from a normal operating distance.
If the lights don’t flash after several attempts, check battery contact and confirm you’re within range of the opener receiver.
How to Sync a Remote to a LiftMaster Opener
“Syncing” is the term most people use when a remote that previously worked has suddenly stopped. The paired connection between the remote and opener has been lost — and they need to re-establish their rolling code handshake.
This is more common than most people realize, and usually happens after:
- A power surge or prolonged outage
- Replacing the opener’s backup battery
- Accidental memory erase (often from an unknowing family member holding the wall button too long)
- Multiple simultaneous button presses throwing the code out of sequence
The fix is the same pairing process described above. Before you go through it, though — if the remote worked fine until recently and nothing obvious changed, check the battery first. A weak battery is the most underdiagnosed cause of sudden remote failure.
Why Your LiftMaster Remote Is Not Working
Before assuming the worst, work through these in order. Most remote failures trace back to one of four things.
Dead or Weak Battery
This is the number one culprit — and it’s consistently underestimated. A dying battery doesn’t always kill the signal completely. It often causes the remote to work only from a few feet away, or to work intermittently.
If your remote works up close but fails at a normal distance, replace the battery before doing anything else. Even a “relatively new” battery can be weak enough to cause this.
Signal Interference
LiftMaster remotes operate on specific radio frequencies, and several common household devices can disrupt that signal. The biggest offender in recent years? LED bulbs — particularly cheap, off-brand ones installed inside or near the opener housing.
Other common sources of interference:
- Security cameras and video doorbells
- Baby monitors
- Some smart home hubs
- Nearby cell towers or radio equipment
If the remote works at close range but not from across the garage, swap in a LiftMaster-approved LED bulb — they’re engineered to avoid the frequency interference that standard LED bulbs create. It’s a $10 fix that solves the problem more often than you’d expect.
Pairing Lost or Corrupted
If the battery is good and interference isn’t the issue, the remote may have simply dropped its pairing. Run through the re-pairing process. This is especially likely if there was a recent power event in your home.
Learn Button or Receiver Issue
If the Learn button LED doesn’t illuminate at all when pressed, or the opener consistently refuses to accept new programming, the receiver board may be the problem. Try a 60-second unplug first. If it still doesn’t respond, this is a component-level issue that warrants a professional inspection — particularly in openers that are 10+ years old or have experienced a surge.
How to Program a LiftMaster Keypad
A wireless keypad is one of the most practical accessories for any garage — useful for family members, regular visitors, or simply eliminating the need to carry a remote everywhere.
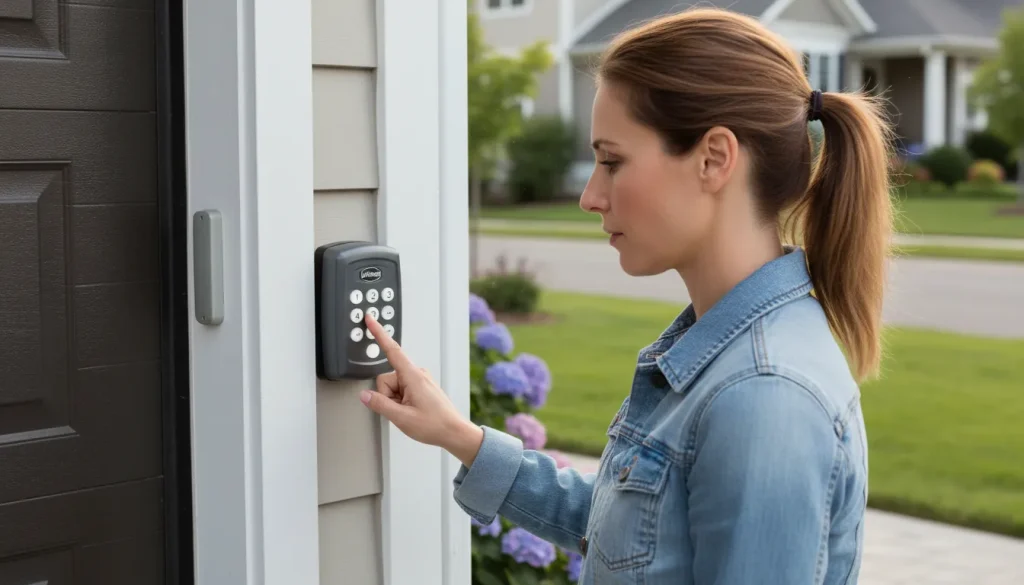
Standard keypad programming:
Standard keypad programming:
- Enter your desired PIN on the keypad, then press and hold the Enter button (marked with an asterisk or arrow symbol on most models).
- While holding Enter, walk to the opener and press and release the Learn button.
- Return to the keypad and press Enter one more time.
- The opener lights will flash to confirm.
Temporary guest access
If your opener is WiFi-enabled, the MyQ app lets you set up temporary PINs for contractors, house sitters, or delivery services without giving out your permanent code. It’s a feature worth using.
After a full memory erase: Your keypad PIN is wiped along with everything else. You’ll need to reprogram it using the steps above.
Common LiftMaster Troubleshooting Problems
Motor Runs But the Door Doesn’t Move
The opener is working — but something has disconnected it from the door. Check the emergency disconnect cord (the red rope hanging from the drive trolley). If it’s been pulled — intentionally or accidentally — the door is no longer connected to the drive mechanism.
To re-engage: pull the cord toward the motor unit, or manually push the door until the trolley clicks back into position. If this keeps happening on its own, the disconnect mechanism may need adjustment.
Door Reverses Before Fully Closing
This is almost always a safety sensor issue. The two small sensors mounted near the bottom of the door tracks must be aligned and unobstructed. If they’re off, the opener interprets it as an obstruction and reverses the door.
Check for:
- A blinking amber LED (indicates misalignment)
- Dirt, cobwebs, or debris on the sensor lens
- Direct sunlight hitting the sensor receiver
- A sensor nudged out of position by foot traffic or a car
Realign both sensors until the LEDs are solid — amber on the sending side, green on the receiving side — then test.
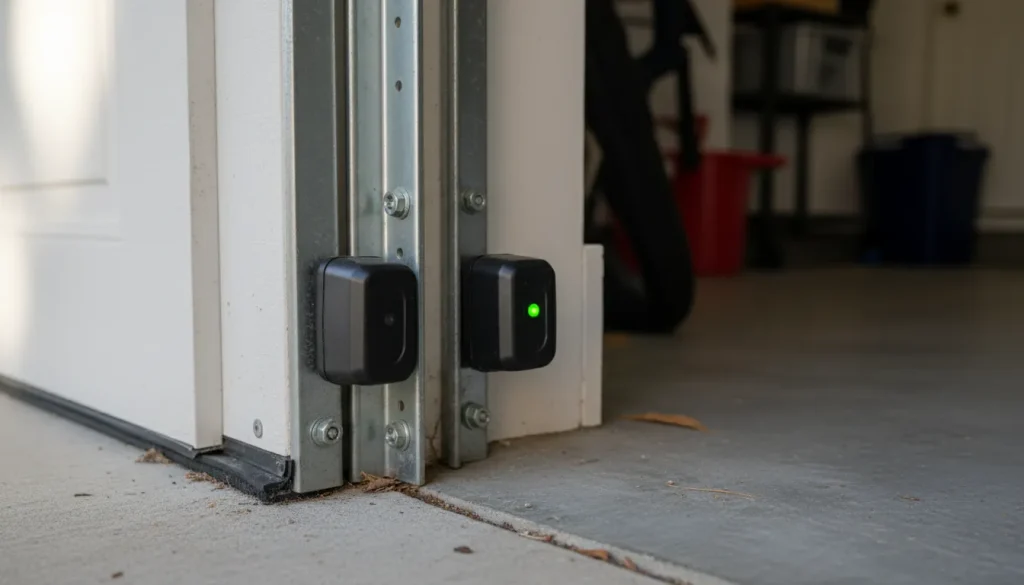
If realignment doesn’t fix it, the wiring or sensor units may need replacement. That’s a straightforward job for a technician — part of a standard garage door maintenance visit.
Door Struggles or Stalls in Cold Weather
Midwest winters are genuinely hard on garage door systems. Cold temperatures thicken lubricants, reduce spring flexibility, and drain remote batteries faster. If your door starts acting up every January, it’s rarely an opener problem — it’s usually a mechanical one.
Lubricate the springs, rollers, and hinges with a silicone-based spray (not WD-40, which attracts dirt and degrades rubber). If the springs themselves are aging and losing tension, cold weather accelerates that deterioration. Our team handles garage door spring repair in South Bend year-round — including emergency calls when a spring snaps mid-winter.
Opener Lights Flash a Specific Number of Times
LiftMaster uses a blink code system to communicate specific errors. Rather than guessing, count the flashes and cross-reference with your model’s manual. Five blinks commonly indicates a sensor fault; four blinks often points to a safety reversing issue. The LiftMaster website also maintains an up-to-date blink code reference by model number.
MyQ App Shows “Unknown” or Won’t Connect
First, confirm your home WiFi is broadcasting on 2.4 GHz — most LiftMaster smart openers don’t support 5 GHz-only networks. If that’s fine, run through the MyQ setup process again from within the app. If connectivity drops repeatedly, the issue may be with the opener’s WiFi module rather than your network.
When to Call a Garage Door Professional
Most programming and sensor issues are genuinely DIY-friendly. These situations are not:
Broken torsion or extension springs
Springs are under hundreds of pounds of tension. A broken spring isn’t just an inconvenience — it’s a safety hazard. If you hear a loud bang from your garage and the door suddenly won’t open, there’s a good chance a spring snapped. This requires professional repair. Don’t attempt it yourself. We offer same-day garage door spring repair for exactly these situations.
Motor straining, grinding, or overheating
If the opener sounds labored, grinding, or noticeably hotter than usual, stop using it. Continued operation can burn out the motor or cause the door to fail in a dangerous position.
Logic board failure
If the opener doesn’t respond to any input after a soft reset, the control board may have failed — especially common after a power surge. Replacement is straightforward for a technician but not a DIY repair.
Door off track
A door that has jumped its track is a structural issue. Forcing it can damage panels, cables, or the track itself. Call for emergency garage door repair rather than trying to muscle it back.
You’re not sure what’s wrong. That’s a completely valid reason to call. A quick diagnostic visit is far cheaper than a repair made worse by guesswork. Our team is also happy to point you in the right direction over the phone before scheduling anything.
Frequently Asked Questions
How do I know which Learn button color my opener has — and why does it matter?
Look directly at the motor unit on your opener. The button color indicates the radio frequency your system uses: Yellow = 390 MHz (older models), Green or Purple = 315 MHz, Orange = 315 MHz with Security+ 2.0 (the newest standard). This determines which replacement remotes are compatible. Buying the wrong remote for your frequency means it simply won’t pair, regardless of how many times you try.
Will a factory reset delete my MyQ account and settings?
Erasing the opener’s memory via the Learn button will unpair all connected devices — including those linked through MyQ. Your MyQ account itself remains intact, but you’ll need to re-add the opener to the app and re-sync any devices after a full reset.
My remote only works when I’m standing right under the opener. What’s going on?
Start with a fresh battery — this symptom almost always points to a weak cell rather than a broken remote. If a new battery doesn’t help, look at the bulbs inside or near your opener. Off-brand LED bulbs are a well-documented source of radio interference that degrades signal range. Swap in a LiftMaster-compatible bulb and test again.
Can I use a universal remote with my LiftMaster opener?
Yes — brands like Chamberlain and Clicker make universal remotes compatible with most LiftMaster systems. Verify compatibility with your specific model before purchasing. The pairing process is identical to a standard LiftMaster remote.
How many devices can I pair to one LiftMaster opener?
Most current LiftMaster models support up to 40 individual devices in memory — remotes, keypads, and MyQ-connected devices combined.
My garage door opens by itself sometimes. What would cause that?
The most common causes are a stuck or shorted wall button, a remote button that’s depressed under a car seat, or (less commonly) a neighbor’s older system on the same frequency. Check the wall button first — press it manually and see if it feels sticky or doesn’t spring back cleanly. That’s often the culprit.
Does cold weather actually affect LiftMaster openers?
Yes, in several ways. Cold thickens lubricants and stiffens springs, which puts more load on the opener motor. It also drains remote batteries faster. If your door starts struggling every winter, the issue is usually mechanical rather than electrical — annual fall maintenance can prevent most of it. We offer garage door tune-up and maintenance service before the season changes, which includes lubrication, spring tension check, and sensor calibration.
What’s the difference between reprogramming and replacing a garage door opener?
Reprogramming fixes software-level issues — lost pairing, sync errors, forgotten PINs. If reprogramming doesn’t resolve the issue and the motor, logic board, or drive system is failing, replacement may be the better long-term value. A technician can help you weigh repair vs. replacement costs honestly. If you’re at that crossroads, we’re happy to walk through your options — including new garage door opener installation if it comes to that.
Need Help With Your Garage Door Opener?
This guide covers the vast majority of LiftMaster programming and troubleshooting issues homeowners run into. Work through the steps methodically — most problems are solved before you reach the bottom of the list.
That said, garage doors are heavy mechanical systems, and some repairs are genuinely beyond the DIY line. If you’ve worked through this guide and something still isn’t right — or if you’re dealing with a spring, a door off track, or an opener that just won’t respond — our team is here to help.
South Bend Garage Door Repair serves the greater Michiana area with same-day and emergency service. We’re straightforward about what actually needs fixing — no pressure, no upselling, just honest diagnostics and reliable work.
📞 Contact us here or call to schedule service. We’re usually able to get out the same day for urgent issues — including nights and weekends for emergency garage door repairs.
Reviewed by Mike Harrington, Lead Garage Door Technician at South Bend Garage Door Repair. 14+ years of field experience servicing residential and commercial garage door systems across St. Joseph County, Indiana.
Last updated: 2025